
GitHub is a web-based platform that allows developers to collaborate on code, track changes, and manage versions of their projects.
It is widely used by both individuals and teams to manage software development projects, ensuring that multiple contributors can work on the same codebase without conflicts.
With the increasing complexity of modern software projects, version control has become essential, and GitHub provides an intuitive way to implement it.
In this article, we will walk you through the process of using GitHub for version control and collaboration, covering everything from setting up Git to managing branches and using GitHub’s powerful collaboration features.
Whether you are a beginner or have some experience with version control, this guide will help you understand how to effectively use GitHub in your development process.
Introduction to Git and GitHub
Version control systems (VCS) allow software developers to track changes made to code over time, providing a history of modifications.
Git is a distributed version control system that enables developers to work on a project simultaneously without affecting each other’s work.
It tracks changes locally and remotely, providing an easy way to collaborate. GitHub, on the other hand, is a cloud-based platform that hosts Git repositories, making it easier for developers to share, collaborate, and contribute to open-source and private projects.
GitHub has revolutionized how developers work together on code, offering not just version control, but features like issue tracking, pull requests, and project management tools.
With GitHub, developers can maintain a clean, organized workflow while ensuring their codebase remains intact, even when multiple people are contributing to it.
The combination of Git and GitHub makes it possible to efficiently collaborate on software development, enhance productivity, and streamline the coding process, regardless of the project’s size.
Setting Up Git and GitHub Account
Before you can start using GitHub for version control and collaboration, you need to set up Git and create a GitHub account. Below is a step-by-step guide to get you started.
Step 1: Install Git
To use Git for version control, you’ll first need to install it on your local machine. Git is available for Windows, macOS, and Linux, and installation instructions can be found on the official Git website.
- For Windows: Download the Git installer for Windows from the Git website. Once the installer is downloaded, follow the installation prompts. After installation, you can use Git through Git Bash or your command line interface (CLI).
- For macOS: If you’re using macOS, Git is often pre-installed, but you can update it using the Homebrew package manager or download it from the Git website.
- For Linux: On Linux systems, you can install Git using the package manager. For example, on Ubuntu, use the following command:bashCopy code
sudo apt-get install git
Once Git is installed, you can verify the installation by running the following command in your terminal:
bashCopy codegit --version
This should display the installed version of Git.
Step 2: Create a GitHub Account
Next, you’ll need to create a GitHub account to host your repositories and collaborate with others. Visit https://github.com and click on the Sign up button.
You will need to provide your username, email address, and password. GitHub offers free and paid plans, but the free plan should be sufficient for individual developers or small teams.
Once you have created your account, verify your email address and log in to GitHub. You are now ready to create repositories and start collaborating on code.
Step 3: Link Git with GitHub
After installing Git and setting up your GitHub account, you need to link Git with GitHub.
To do this, configure your Git settings to use your GitHub username and email. This is essential because Git uses this information to track changes you make to the code.
In your terminal, run the following commands to set your global username and email address:
bashCopy codegit config --global user.name "Your Name"
git config --global user.email "your-email@example.com"
By setting these global configurations, Git will automatically use this information for all repositories on your machine. You can also set them per repository if needed.
ALSO READ: How to Start a Career in Web Development
Creating a Repository
Once your Git and GitHub accounts are set up, the next step is to create a GitHub repository (repo).
A repository is where all the files and the version history of your project will be stored.
You can create a repository for any project you’re working on, whether it’s open-source or private.
Step 1: Create a New Repository on GitHub
To create a new repository on GitHub:
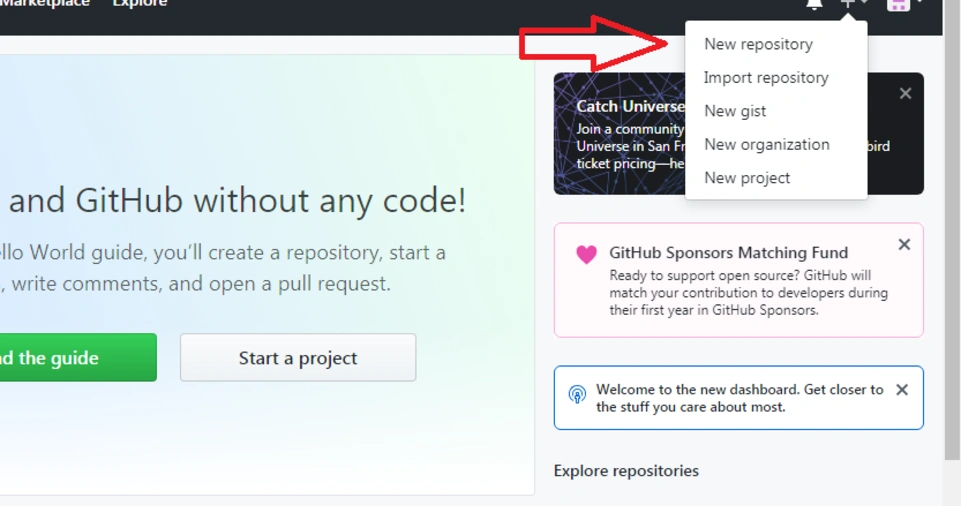
- Log in to GitHub and click on the + icon in the top-right corner of the page, then select New repository.
- Choose a name for your repository and, optionally, provide a description.
- Select the visibility of your repository (Public or Private).
- Check the box to initialize the repository with a README file (recommended).
- Click on Create repository.
Step 2: Clone the Repository to Your Local Machine
Once the repository is created, you can clone it to your local machine to start working on the code. Copy the repository’s URL (use HTTPS or SSH, depending on your preference).
In your terminal, run the following command:
bashCopy codegit clone https://github.com/your-username/your-repo-name.git
This will create a copy of the repository on your local machine, allowing you to start adding and modifying files.
Step 3: Start Working on Your Code
Navigate into the cloned repository directory:
bashCopy codecd your-repo-name
You can now begin working on your project files.
Making Changes to Your Project
GitHub is built around Git, and the fundamental workflow in Git involves making changes to your code, tracking them, committing them, and pushing them to GitHub.
Here’s how you can manage changes in your project:
Step 1: Editing Files
After cloning the repository, you can edit files in your preferred code editor or IDE. For instance, you might want to add a new feature, fix a bug, or improve documentation.
Step 2: Track Changes with Git
Git allows you to track the changes you make to files. Before committing your changes, Git needs to know which changes you want to include. You can track modified files using:
bashCopy codegit status
This command shows which files have been modified, added, or deleted. To add files to the staging area, use:
bashCopy codegit add <filename>
To add all changes at once, you can use:
bashCopy codegit add .
Step 3: Commit Changes
Once the changes are staged, you need to commit them to Git. A commit is a snapshot of your changes, including a message describing what was done. Run the following command to commit:
bashCopy codegit commit -m "Your commit message"
It’s important to write clear and descriptive commit messages to explain the purpose of the changes.
Step 4: Push Changes to GitHub
After committing your changes, you need to push them to GitHub to update the remote repository. Use the following command to push your changes:
bashCopy codegit push origin main
The main branch is typically the default branch, but it can vary depending on the repository’s settings.
Using Branches for Collaboration

One of the most important features of GitHub is branching.
Branches allow developers to work on different features or fixes simultaneously without affecting the main codebase.
Once the work is completed on a branch, it can be merged back into the main branch.
Step 1: Create a Branch
To create a new branch, use the following command:
bashCopy codegit checkout -b new-feature
This creates a new branch named new-feature and switches to it. Any changes you make will now be isolated to this branch.
Step 2: Push the Branch to GitHub
Once you’ve made changes to the branch and committed them, push the branch to GitHub:
bashCopy codegit push origin new-feature
Step 3: Create a Pull Request
A pull request (PR) is a way to propose changes to the main project. On GitHub, go to the repository’s Pull Requests tab and click New pull request. Select your branch (e.g., new-feature) and the base branch (usually main). Then, you can write a description and submit the pull request for review.
Step 4: Review and Merge Pull Requests
Team members can review the pull request, suggest changes, and even discuss the changes in the comments.
Once the pull request is approved, you can merge it into the main branch. On GitHub, you can do this by clicking Merge pull request.
Resolving Merge Conflicts
Occasionally, you may run into merge conflicts when two people have made changes to the same part of a file.
GitHub provides an interface for resolving merge conflicts, allowing you to manually select which changes to keep.
To resolve a merge conflict:
- Pull the latest changes from the main branch.
- Manually resolve the conflict in the conflicting files.
- Stage the resolved files using
git add. - Commit the changes and push them back to GitHub.
Collaboration Features of GitHub
GitHub offers a variety of tools that facilitate collaboration among team members. Here are some of the most important ones.
Issues and Projects
GitHub provides tools for tracking bugs, tasks, and new features using Issues. You can create an issue for any part of the project that needs attention, and you can assign it to specific team members.
GitHub also supports project management features like Kanban boards, which help you organize tasks and track progress.
GitHub Actions
GitHub Actions enables you to automate workflows directly within your repository.
You can set up continuous integration (CI) and continuous deployment (CD) pipelines to automate tasks like testing, building, and deploying your application.
Wiki
GitHub provides a built-in wiki feature that allows you to document your project, including instructions, guides, and explanations.
This is useful for maintaining project documentation and making it accessible to all collaborators.
Conclusion
GitHub is an essential tool for modern software development, providing powerful features for version control and collaboration.
Whether you’re working on a personal project or collaborating with a team, GitHub helps streamline your workflow and ensures that everyone is on the same page.
By understanding the fundamentals of Git and GitHub—such as creating repositories, using branches, and resolving conflicts—you can take full advantage of these tools to improve your development process and create better software.